
Tree Meringue Cookies – A Festive Delight for Your Holiday Table
Introduction
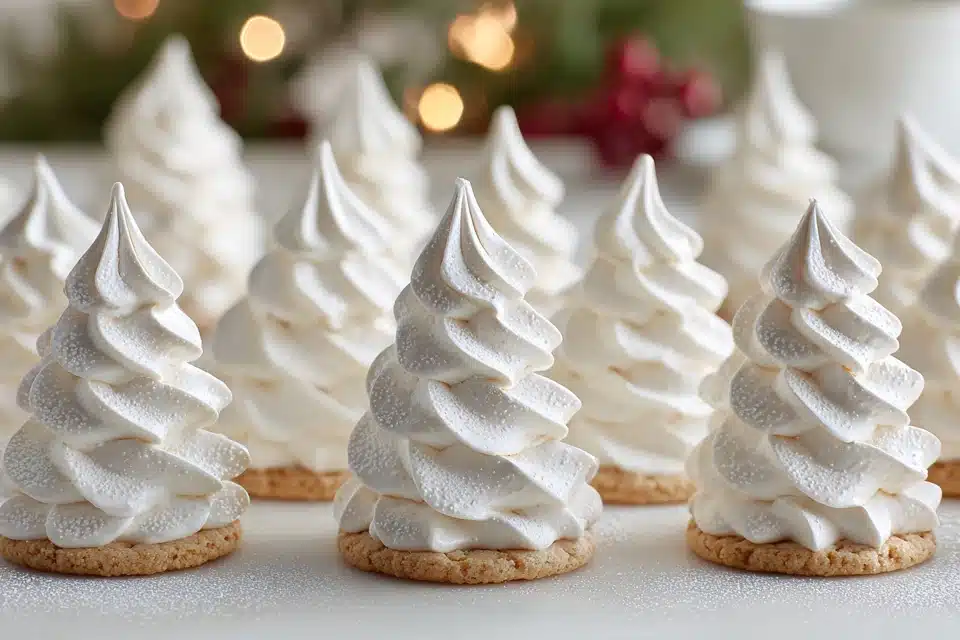
There’s something truly magical about the holiday season — and nothing captures that magic quite like these Tree Meringue Cookies. Light as air, delicately sweet, and charmingly shaped like tiny Christmas trees, these cookies are as delightful to look at as they are to eat.
Crisp on the outside and slightly chewy in the center, meringue cookies are a holiday classic with a whimsical twist in this recipe. Naturally gluten-free and low in fat, they make a beautiful addition to dessert platters, cookie boxes, or as edible decorations at your holiday table.
With a swirl of green, a sparkle of sugar, and a little star on top, these cookies bring festive cheer in every bite — no elaborate decorating required.
Ingredients Overview
Meringue cookies are simple, but every ingredient matters for that perfect cloud-like texture and tree shape:
- Egg Whites: The foundation of meringue. Use fresh, room-temperature egg whites for the best volume. Avoid even the smallest trace of yolk, as fat interferes with whipping.
- Granulated Sugar: Slowly added to the egg whites, it stabilizes the meringue and creates a glossy, stiff texture. Superfine sugar dissolves more easily but regular white sugar also works.
- Cream of Tartar: A key stabilizer. This acidic ingredient helps the egg whites whip to firm peaks and prevents collapse. Lemon juice or white vinegar can be used as a substitute.
- Vanilla Extract: Adds a warm, sweet flavor note that complements the sugar.
- Green Gel Food Coloring: Gives the meringue its festive tree-green hue. Gel coloring is preferred over liquid to maintain the stiff consistency.
- Sprinkles or Sugar Pearls: For decorating the “trees.” Gold stars, mini nonpareils, or sanding sugar add a festive sparkle.
Optional Add-ins:
- Peppermint or almond extract (just a drop!) for flavor variation
- Edible glitter for extra shimmer
- White chocolate base to “stand” the trees upright
Step-by-Step Instructions
Making meringue cookies takes patience and care — but the results are absolutely worth it.
- Prep your baking sheet and oven:
Preheat the oven to 200°F (90°C). Line a baking sheet with parchment paper. These cookies bake low and slow to dry out without browning. - Separate the eggs:
Carefully separate egg whites from yolks, ensuring no yolk contaminates the whites. Let the whites come to room temperature — this helps them whip to higher volume. - Whip the egg whites:
In a clean, grease-free bowl, beat the egg whites on medium speed until frothy. Add cream of tartar and continue beating until soft peaks form. - Add sugar gradually:
Increase the speed to high and add sugar slowly, 1 tablespoon at a time. Beat well after each addition. Once all the sugar is incorporated, continue beating until stiff, glossy peaks form — this can take 7–10 minutes. - Add flavor and color:
Gently fold in vanilla extract and green gel food coloring. Use just enough to get a vibrant but natural-looking tree green. - Pipe the trees:
Spoon the meringue into a piping bag fitted with a large star or round tip. Pipe tall tree-shaped swirls onto the prepared baking sheet, pulling up slightly at the top to create a pointed peak. Space them slightly apart — they won’t spread. - Decorate:
While the meringue is still wet, decorate with tiny sprinkles or edible stars. Be gentle so you don’t deflate the shapes. - Bake and dry:
Bake at 200°F for 1½ to 2 hours, or until the cookies are dry to the touch and easily lift off the paper. Then turn off the oven and let the cookies sit inside for another hour to fully dry out and avoid cracking from temperature change. - Cool and store:
Once cool, store in an airtight container at room temperature for up to 1 week — longer if humidity is low.
Tips, Variations & Substitutions
- Humidity is the enemy: Make these on a dry day. Moisture in the air can prevent meringue from drying properly.
- Use a glass or metal bowl: Plastic can retain grease, which interferes with egg whites whipping to full volume.
- Flavor twist: Add peppermint extract or lemon zest for a new take on the classic.
- For chocolate lovers: Dip the bottoms in melted dark chocolate once cooled for a crunchy contrast.
- Mini trees: Use a smaller tip to create bite-sized meringue kisses — ideal for kids or cookie boxes.
- No piping bag? Use a zip-top bag with the corner snipped off — the shapes won’t be as detailed but will still be festive and fun.
Serving Ideas & Occasions
These meringue tree cookies are as versatile as they are beautiful:
- Holiday cookie platters: Their color and shape make them a stunning visual addition.
- Gifting: Package a few in a cellophane bag tied with ribbon for a thoughtful handmade treat.
- Table décor: Place one at each holiday table setting for a sweet edible touch.
- Kids’ treats: Light and naturally gluten-free, these are perfect for classrooms or holiday bake sales.
- Hot cocoa topper: Pop one on top of whipped cream for a festive finish to your favorite warm drink.
Nutritional & Health Notes
While meringue cookies are still a dessert, they offer a lighter alternative to traditional holiday sweets:
- Low in fat: Made with just egg whites and sugar, these cookies are naturally fat-free (unless dipped in chocolate).
- Naturally gluten-free: No flour needed, making them suitable for gluten-sensitive guests.
- Portion-controlled: One or two cookies satisfy a sweet tooth without going overboard.
- Dye-free options: You can skip the green color entirely and keep them snow white or use natural food dyes (like spinach powder) for a more natural look.
Because they’re mostly air and sugar, these treats are light — both in calories and in texture.
FAQs
Q1: Why didn’t my meringue whip to stiff peaks?
This is often due to grease or egg yolk in the whites. Be sure your bowl and beaters are completely clean and dry, and that no yolk sneaks into your whites.
Q2: Can I use liquid food coloring?
Gel or paste food coloring is better, as it adds less moisture. Too much liquid can cause the meringue to collapse or bake unevenly.
Q3: Why are my cookies sticky or chewy?
Humidity may be the culprit. Bake them longer at a low temperature or let them dry in the oven with the door slightly ajar. Avoid making meringues on humid days.
Q4: Can I make these ahead of time?
Yes! Store in an airtight container at room temperature. They last up to a week, but longer if your home is dry and cool.
Q5: Can I freeze meringue cookies?
Freezing is not recommended. Moisture from thawing can ruin the texture and make them sticky or soft.
Q6: What piping tip works best for tree shapes?
A large closed star tip like Wilton 1M gives a beautiful swirl. You can also use a round tip for a smooth tree shape.
Q7: Can I make them without cream of tartar?
Yes — substitute with ½ teaspoon lemon juice or white vinegar. These acids help stabilize the egg whites during whipping.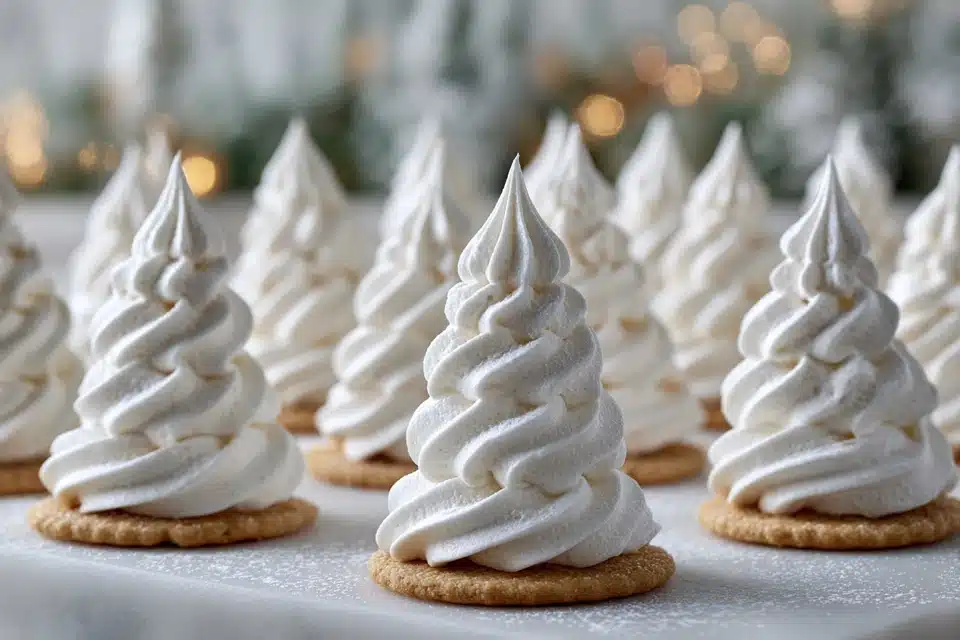
Christmas Meringue Cookies – Light, Sweet & Festive
Crispy, sweet, and shaped like festive Christmas trees, these light-as-air meringue cookies are perfect for holiday trays and gifting.
- Prep Time: 20 minutes
- Cook Time: 2 hours
- Total Time: 3 hours (including drying)
- Yield: 24 cookies 1x
Ingredients
- 4 egg whites, room temperature
- 1 cup granulated sugar
- ¼ teaspoon cream of tartar
- 1 teaspoon vanilla extract
- Green gel food coloring
- Sprinkles or edible stars, for decorating
Instructions
- Preheat oven to 200°F and line a baking sheet with parchment paper.
- Beat egg whites until frothy. Add cream of tartar and continue beating to soft peaks.
- Gradually add sugar, 1 tbsp at a time, while beating on high. Beat until stiff, glossy peaks form (7–10 min).
- Gently fold in vanilla and food coloring.
- Pipe tall swirls onto baking sheet using a star tip. Decorate with sprinkles.
- Bake for 1½–2 hours until dry. Turn off oven and let sit inside for 1 hour.
- Cool completely and store in an airtight container.
Notes
- Make on dry, low-humidity days for best results.
- Use superfine sugar for easier dissolving.
- Avoid opening the oven during baking.