

Peppermint Swirl Fudge – Creamy, Festive, and Foolproof
Introduction
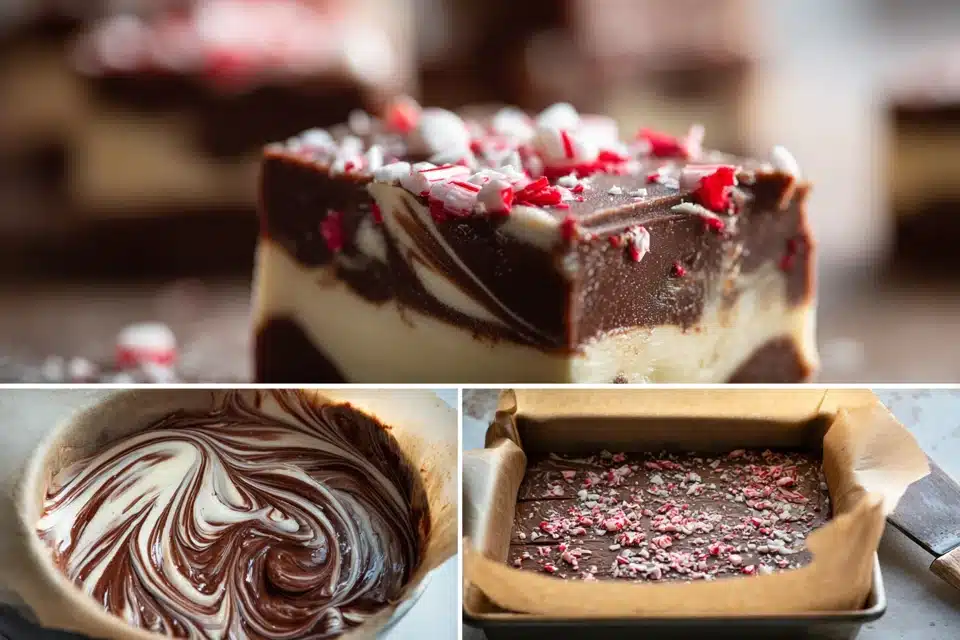
This peppermint swirl fudge is a dreamy holiday treat that combines creamy white chocolate with crushed candy canes and a stunning red peppermint swirl. It’s rich, smooth, and full of cool peppermint flavor — perfect for Christmas gifting, cookie trays, or holiday dessert spreads.
Best of all? It’s a no-bake, microwave-friendly recipe that comes together in minutes with just a handful of ingredients. Whether you’re a seasoned baker or a holiday treat novice, this peppermint fudge is practically foolproof and always a crowd-pleaser.
Ingredients Overview
Sweetened Condensed Milk
This is the base of the fudge and provides sweetness, structure, and creaminess.
- Use full-fat sweetened condensed milk for best texture.
- Avoid evaporated milk — it’s not a substitute here.
White Chocolate
The key to a smooth, melt-in-your-mouth fudge.
- Use high-quality white chocolate chips or baking bars.
- Chop bars finely for even melting.
- Avoid candy melts — they don’t behave the same way.
Peppermint Extract
Adds a cool, refreshing flavor that complements the sweet white chocolate.
- Use pure peppermint extract, not mint extract (which can taste like spearmint).
- A little goes a long way — too much can overpower.
Red Food Coloring
For that beautiful swirl effect.
- Gel food coloring works best — vibrant color without thinning the fudge.
- Use a toothpick to drag and swirl for a marble effect.
Crushed Candy Canes
For crunch, color, and festive flair.
- Crush gently in a zip-top bag using a rolling pin — not too fine.
- Sprinkle on top just before setting to keep them crisp and colorful.
Butter (Optional)
A small amount of butter can help with texture and gloss, but it’s optional in this version.
Step-by-Step Instructions
1. Line the Pan
- Line an 8×8-inch square baking dish with parchment paper or foil.
- Lightly grease for easy removal later.
2. Melt the Base
In a microwave-safe bowl or on the stovetop:
- Combine 3 cups white chocolate chips and 1 (14 oz) can of sweetened condensed milk.
- Microwave in 30-second bursts, stirring between each, until smooth and fully melted.
- Stir in ½ tsp peppermint extract (taste and add up to ¾ tsp if needed).
3. Swirl the Color
- Pour the fudge mixture into the prepared pan.
- Drop small dots of red gel food coloring on top (start with 4–6 drops).
- Use a toothpick or knife to swirl gently into a marbled pattern.
Don’t overmix or the entire batch may turn pink.
4. Top with Candy Canes
- Sprinkle ¼–⅓ cup crushed candy canes over the top.
- Press gently so they adhere without sinking.
5. Chill
- Refrigerate the fudge for at least 3 hours, or until firm enough to slice.
- Once set, lift out of the pan and cut into squares.
Tips, Variations & Substitutions
- Add Texture: Stir in mini marshmallows or chopped chocolate before spreading in the pan.
- Chocolate Swirl: Drop in melted dark chocolate and swirl with the white base for a two-tone effect.
- Layered Fudge: Let half the white layer set, then add a pink layer on top for a stacked look.
- No Food Coloring? Just skip it — the flavor is still festive without the swirl.
- Make Ahead: Stores well in the fridge for 1–2 weeks or freeze for up to 3 months.
Serving Ideas & Occasions
Peppermint swirl fudge is perfect for:
- Holiday cookie platters
- Gifting in treat boxes or jars
- Christmas Eve dessert tables
- Winter wedding favors or potlucks
Pair with:
- Hot cocoa or peppermint mocha
- Gingerbread cookies for a flavor contrast
- Chocolate bark or truffles for a candy tray
Its creamy texture and cool mint flavor make it a refreshing yet indulgent treat.
Nutritional & Health Notes
While this is a rich, sweet treat, it’s:
- Naturally gluten-free
- Easy to portion control — a little square goes a long way
- Made without eggs or flour, making it allergy-friendly for many
For lighter fudge:
- Use reduced-sugar white chocolate (if available)
- Cut into smaller bite-sized squares
- Reduce the peppermint candy topping if needed
FAQs
Q1: Can I make this fudge without a microwave?
Yes — melt the chocolate and condensed milk together in a heatproof bowl over a saucepan of simmering water (double boiler method).
Q2: Why did my fudge turn grainy?
Overheating the chocolate can cause it to seize. Melt gently in short bursts and stir well.
Q3: Can I freeze peppermint fudge?
Yes. Wrap tightly and freeze for up to 3 months. Thaw in the fridge overnight before serving.
Q4: Can I use almond bark instead of white chocolate?
You can, but the flavor and texture will be slightly different. Choose a high-quality brand for best results.
Q5: How long will it last?
Store in an airtight container in the refrigerator for up to 2 weeks. Keep layers separated with wax paper.
Q6: Can I make this dairy-free?
Try using dairy-free white chocolate chips and coconut condensed milk. Results may vary slightly in firmness.
Q7: Can I double the batch?
Yes — use a 9×13-inch pan instead of 8×8. Increase setting time in the fridge to ensure it firms up.
Peppermint Chocolate Fudge – Easy Christmas Treat
A creamy, festive white chocolate fudge swirled with peppermint and topped with crushed candy canes — the perfect holiday treat with no baking required.
- Prep Time: 10 minutes
- Cook Time: 3 hours
- Total Time: 3 hours 10 minutes
- Yield: 25 squares 1x
Ingredients
- 3 cups white chocolate chips
- 1 (14 oz) can sweetened condensed milk
- ½–¾ tsp peppermint extract
- Red gel food coloring (4–6 drops)
- ¼–⅓ cup crushed candy canes
Instructions
- Line an 8×8-inch pan with parchment and lightly grease.
- Melt white chocolate and condensed milk together in a microwave-safe bowl. Stir until smooth.
- Add peppermint extract and stir.
- Pour into pan and smooth the top.
- Add drops of red food coloring and swirl with a toothpick.
- Sprinkle with crushed candy canes and press lightly.
- Refrigerate for 3+ hours until firm. Cut into squares.
Notes
Use gel food coloring for vibrant swirls. Store in fridge for up to 2 weeks. Great for freezing and gifting.y